
Specification Onyx Ceph 3
OnyxCeph3 ™ is a Windows client-server application with a powerful SQL database that
is approved as a medical product for processing 2D and 3D data, mainly for
* Diagnostics based on image processing,
* Treatment planning and
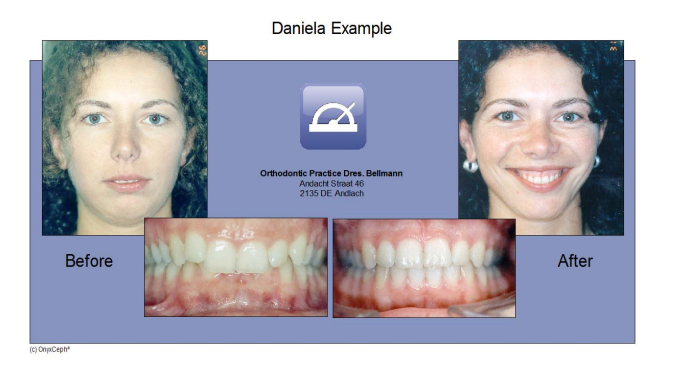
* Familiarization of patients
In dentistry, orthodontics, prosthetics, implantology and maxillofacial surgery.
OVERVIEW OF THE PROGRAM
The software development concept guarantees the best results, professional competence and flexibility, as well as the use of the latest databases and programming techniques and compatibility with new hardware technologies. The special, underlying, so-called 2D|3D Consistent Cephalometric Concept ensures that requirements-dependent and technical equipment-tested diagnostic methods and treatment planning can be used together with modern technologies. Compare Onyx Ceph 3° based on criteria such as quality, functionality, stability, ease of use, ability to change, updates, integration, price, and technical support.
Quality
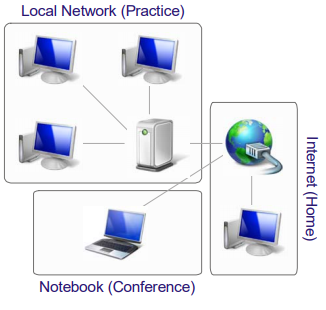
Install OnyxCeph3 ™ – SQL databases in your practice or clinic and access your diagnostic data from all computers on your network.
Use the implemented interface for integrate Onyx Ceph 3° into your management clinic. Connect Onyx Ceph 3° to all analog and digital image sources used in your clinic.Make your work server available
over the Internet for processing data when you are not at work. Exchange calculations, treatment plans, and other documents with other doctors and colleagues in the treatment process. Send selected cases to your laptop or home computer for processing or presentations.
Functionality
• Management of patients
Manage all your patients ‘ data and documents that are relevant to diagnosis and treatment planning. Sync all your recordings with your clinic management software and with all data from all image sources. Categorize the types of treatments, sessions and research for statistical data processing and analysis in the long term treatment.
• 2D / 3D image data
Here you can get, download, manage, process, and analyze all your patients ‘ 2D and 3D data. Several modules are available, such as TRG calculation and analysis, image matching, mirror symmetry analysis, and comparison CO | CR, Ricketts V. T. O., treatment modeling, overlaying, editing, drawing images, cloning studies, research itself, exporting, sending data, creating forms, documents, letters, printing. Choose one or more of the approximately 100 established TRG analysis methods, or create and order your own analysis.
• Presentations
Create presentation templates according to your wishes and present your images and research as in PowerPoint. For the purpose of teaching patients, you can organize examples of clinical cases (images, videos, animations) in special albums with a tree structure.
• Documents
Design and create your own print forms, letters, documents, or other templates that can automatically integrate patient data, treatment information, images, research data, and treatment plan. Manage these documents and the database by saving them to PDF or printing them on paper.
• Shapes
Use functional forms to manage, display, and fill out created forms HTML forms on the screen, for example, for collecting anamnesis, clinical studies, functional diagnostics, and others.
• Internet
Use the built-in web browser to access the necessary information without enabling itspecial application.
Stability
The NEXUS SQL database used in OnyxCeph ™ for many years shows a high percentage of stability in client / server applications and works as well on the network as fast and stable, providing access to the database via TCP / IP regardless of the total number of patients and snapshots in it. Having a fixed IP address and permission to access the server, you will be able to work with your database remotely without being present in clinic.
Ease of use
In the style of modern Windows ™ applications, the graphical user interface systematizes the functions that are assigned to various bookmarks.

System names and settings can be changed using the onyx Ceph 3°menu.Also, the selection of practices and patients can be made from the main application window. For experienced users with a good knowledge of Windows ™ , this will simplify the main functions of the program.
Integration
Onyx Ceph 3° provides customized and default interfaces for practice and database management software, as well as proprietary SOFTWARE, Image processing SOFTWARE and independent applications. Install important interfaces on each client for importing and exchanging data and communicating with other applications.
SOFTWARE VERSIONS + ADDITIONAL COMPONENTS
OnyxCeph³™ 2D Basic
SQL DATABASE
• 5/1 NETWORK (X|1 on request)
• 1/1 Standalone program
2D image module
* Import snapshots (import snapshots from various connected sources)
• Set up shots (sorting, classification and framing pictures)
• To edit pictures (image processing)
• Combine images
• The “Mirror” (evaluation of the symmetry of the images)
Presentations
• Slide show
* Demonstration of media content
document creation
Forms (DHTML)
Web browser
Recycle bin (recovery of deleted data)
Web messages
Container for data exchange
Exporting snapshots and results
Handbook of techniques
Onyxceph° 2D Pro
SQL DATABASE
• 5/1 NETWORK (X|1 on request)
• 1/1 Standalone program
2D image module
* Import snapshots (import snapshots from various connected sources)
* Customizing images (sorting, classifying, and cropping images)
• editing images (image processing)
• rendering images (cephalometric rendering)
* Markup (drawing)
• Combining images
• The “Mirror” (evaluation of the symmetry of the images)
* Ricketts V. T. O.
* Virtual treatment planning (Ortho|OMS)
• overlay Comparison (Björk)
Presentations
Prices for Onyx Ceph 3° V. 2009.06
• Slide show
* Demonstration of media content
document creation
Forms (DHTML)
Web browser
Recycle bin (recovery of deleted data)
Web messages
Container for data exchange
Exporting snapshots and results
Handbook of techniques
OnyxCeph³™ 3D Basic
SQL DATABASE
• 5/1 NETWORK (X|1 on request)
• 1/1 Standalone program
2D image module
* Import snapshots (import snapshots from various connected sources)
• Set up shots (sorting, classification and framing pictures)
• To edit pictures (image processing)
• Combine images
* Mirror function (image symmetry Estimation)
3D image Module
* Import images (including DICOM rendering, 3D visualization)
* Customizing images (sorting, classifying, and cropping images)
Presentations
• Slide show
* Demonstration of media content
document creation
Forms (DHTML)
Web browser
Recycle bin (recovery of deleted data)
Web messages
Container for data exchange
Exporting snapshots and results
Handbook of techniques
OnyxCeph³™ 3D Pro
SQL DATABASE
Prices for Onyx Ceph 3° V. 2009.06
• 5/1 NETWORK (X|1 on request)
• 1/1 Standalone program
2D image module
* Import snapshots (import snapshots from various connected sources)
* Customizing images (sorting, classifying, and cropping images)
• editing images (image processing)
• rendering images (cephalometric rendering)
* Markup (drawing)
• Combining images
• The “Mirror” (evaluation of the symmetry of the images)
* Ricketts V. T. O.
* Virtual treatment planning (Ortho|OMS)
• overlay Comparison (Björk)
3D image module
* Import images (including DICOM rendering, 3D visualization)
* Customizing images (sorting, classifying, and cropping images)
• The delineation of the images (creation of planes )
Presentations
• Slide show
* Demonstration of media content
document creation
Forms (DHTML)
Web browser
Recycle bin (recovery of deleted data)
Web messages
Container for data exchange
Exporting snapshots and results
Handbook of techniques
Onyx Ceph 3 installation instructions
Part I: installing the server
Part one of the installation process is installing the OnyxCeph3™ SQL server database. Insert CD-ROM in the CD-drive of the computer on which you plan to install the server. If the process autorun is activated in the system, the installation menu will appear on the Desktop automatically. If the autorun process is not activated or the installation is performed from another media ( for example, from a flash drive), run the file OnyxCDMenu.exe which you can find in the root folder of the partition. Select the installation language (1) and click Install Server (2).
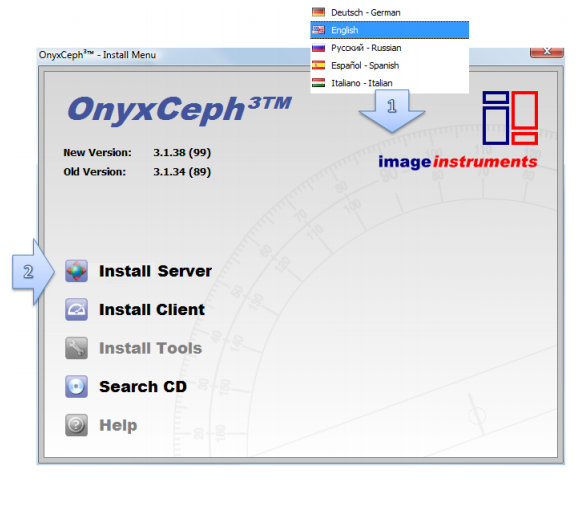
A window opens in the standard installer for Windows™ applications, where you should go through all the installation steps, step by step, until the installation begins. When you are asked to choose a folder for installing the program, we recommend that you save the pre-installed one localization.

After all the files are copied to the designated folder, the server installation is complete, and you can continue installing the client on the network workstations.
The following steps may not be necessary to continue installing the client, but they may help you configure the server to meet your requirements. After the server installation is complete, you will find a new group of programs in the start menu and the OnyxConfig icon on the Desktop:

Launch OnyxConfig from the start menu program group or by clicking (2 times) on the Desktop icon
This allows you to open OnyxCeph3 ™ SQL database server as a program or as a service and easily uninstall or reinstall the service.
It is recommended to run OnyxDBServer.exe as a service. In the case when you need to change basic server settings, such as language or backup, run OnyxDBServer.exe as a program. When the server is running as a program, you will find the icon in taskbar (lower-right corner where the clock is), which has a context menu to open server program window.
The main window of the OnyxDBServer program gives you access to several settings that can be changed when managing your Onyx. However, for stability reasons, we recommend changing only the server program language on the Settings tab (if necessary) and the backup settings on the Backup tab.

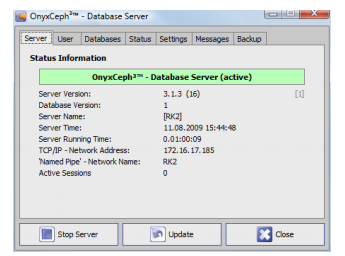
You can change the language settings and backup settings using the specified tabs

Part II: Installing A Workstation (Client)
Part II of the installation process is installing the OnyxCeph3 ™ workstation on one or more computers on the network. If a single station is installed, it is installed on the same computer as the database server. Insert the CD into the CD drive of the computer where you plan to install the server. If the autorun process is activated in the system, the installation menu will appear on the Desktop automatically. If the autorun process is not activated or the installation is performed with
from another media ( for example, from a flash drive), run the file OnyxCDMenu.exe which you can find in the root folder of the partition. Select the installation language (1) and click Install Client(2).

This allows you to select the language of your workstation and then open the onyx Ceph 3°installation window
client’s. Click Install to start installing The client over a network with
a running database server OnyxDBServer.exe via IP port 16300.
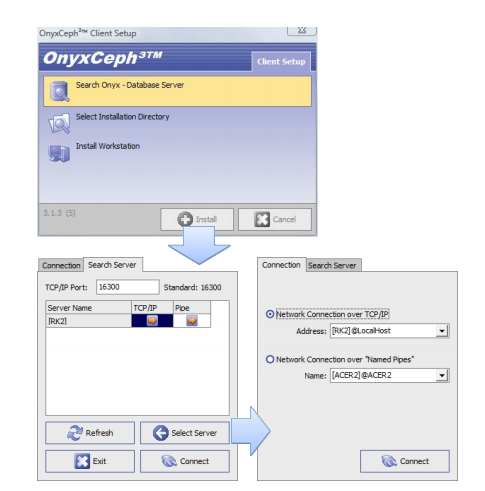 Select the server, then click Connect to connect to the database.
We strongly recommend using a TCP / IP connection to the server. You can also
use the Connect Button on the Server Search tab or click Select first
Server, check the settings on the Connections tab, and then click Connect.After connecting to the database, the folder to install the client should be selected. Use file Explorer to search for a folder or create a new one. We strongly recommend we recommend using the pre-installed localization of the program.
Please note that the onyx 3 Client folder will be
created automatically in the folder selected for
installation

All client files will be copied to the designated folder. After performing the copy the program installation is complete. You will be asked if you want to run Onyx Ceph 3 on your computer right now. Later, you can launch the program from the start menu-group of programs OnyxCeph3 or via the icon on the desktop.
Software Registration
Please note: Without registration, Onyx Ceph 3° can only be used in trial mode for non-commercial testing of clinical cases with a maximum of 10 patients and recording 100 images (including pre-installed demo data). All features will be available after registration. To authorize the software, open the registration window via the Options-Registration menu and complete all three stages of registration.