
Software description
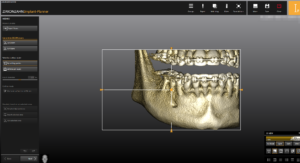
As always, like all similar programs, they begin by importing DICOM CT files into the system. Everything happens quickly and easily. In the second step, the system will offer to cut off the unnecessary densities from the 3D (pixel contrast scale) and cut off the excess (another jaw or artifacts). From the first steps, the harsh interface immediately says – I am a program for the laboratory and for the technician in particular. A bunch of buttons, sliders for fine-tuning and other rubbish. After completing this step, move on to the next. All manipulations in the program are divided into steps (as an assistant) – completed the step, click Next and get the next task. Further, as elsewhere, combining a scanned model with a three-dimensional CT scan – everything is simple and convenient here, we expose a few points, compare, and we automatically find the exact match. If you don’t like it, either add points, or manually adjust it, you have your own tool for rotating and moving the model relative to the CT. The tool is comfortable, but there is no viewing window yet – all this will have to be done in one middle section.
Then, like everyone do, we build a panoramic 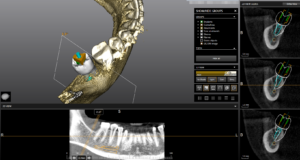 curve, indicate the path of the mandibular canal and put a virtual tooth. Yes, here, unlike many, we put a tooth, not a crown. The sacred meaning of this has remained incomprehensible to us. But there is a suspicion that since Implant Planner is part of the system, they probably decided – why suffer, if you can scan a waxup on our scanner or model crowns in our designer. Well, if you’re not enough, here’s another tooth with a root! Well, okay – with a root, so with a root – we decided and went on to the next step of implant placement.
The most important stage for the doctor
 And here we are at the most important stage for the doctor and actually the unimportant stage for the technician. It is necessary to install an implant. The toolkit is disgusting … We really hope that by the release of the full version it will be corrected! The slices walk as they want, the cross sections are not clear, there is no axial section at all, the implant is not shown at all at the panoramic reconstruction … The library of implants is already quite extensive today and includes not only implants, but also abutment and scan markers. And this is what we are really looking forward to. But more on that later.
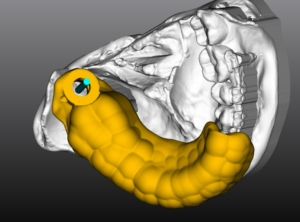
Then we come to a certain intermediate stage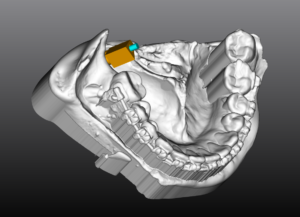 where we can return and correct something or move on to building the template itself. Click Next and get to a strange stage. Here we need to set the direction of dressing the template in the oral cavity. After that, the program will draw a new three-dimensional model of the scanned model, but already with filled intervals of undercuts and depressions … It is clear that somewhere inside each program some calculations should be done, but no one has ever shown them. But ZirconZahn decided to show. And it’s not easy to show, but further editing of the borders of the template will take place precisely on this model. Maybe it`s really comfortable – wait and see.
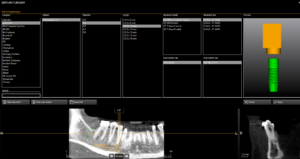
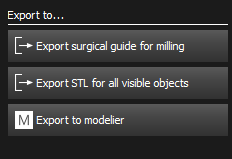
 And now, the cherished button Create a template is pressed, we are waiting for the result. Oh, again not that … Now we need to set (if desired) revision / flushing holes and indicate bushing. Now we get the finished template. Of course, all this is described briefly and quickly, and there are still many windows, buttons and sliders in the program that need to be studied! At the end of the work, you can print the protocol for the doctor – not bad and, it seems quite detailed. But if you compare with the Simplant on a 10-point scale, then 5 … Once again, this program (in this form) is intended for technicians. They will learn and master it quickly. But what about implantology knowledge? How to connect a doctor to planning? Screenshots and downloads again? Is it really impossible to make a small viewing program for a doctor? We will wait and hope …
Export to ZirconZahn Fashion Designer
 Now, with regard to the expected function, which was described above, this is export to ZirconZahn Fashion Designer. Here the fun begins – a complete rejection of analog work and the transition to a clean figure! Without using models, drilling gypsum and other rubbish, we simply upload the position of the implants, scan markers and scan models into the Fashion Designer. And there we are already simulating a temporary construction for an instant load. We mill it on the ZirconZahn milling machine, glue the titanium bases and here you have the exact fit of the orthopedic design on precisely placed implants. One thing – it’s still advisable to perform such operations according to the full protocol. This is when all the manipulations up to the placement of the implants is carried out through one template.